Heater Core Replacement: Regal part # 52479872
(Same procedure for the AC evaporator GM# 3056081---after market 6516)
I don't recall who authored the following instructions on heater core replacement but, it is quite detailed and correct. I have added some comments and some pictures to hopefully make it easier to do. This is one of those pain in the neck jobs that requires more patience and care than it is difficult. Note that the same procedure is required to access the evaporator core. If you have to do the evaporator, might be good to go ahead and do the heater as well unless it is fairly new.
It really helps to take pictures each time you pull off a layer of the various brackets and such. Might save you from some trial and error, or having to walk over to your other car to look as you reassemble.
1. Remove bulb from under hood lamp to prevent battery drain.
2. Remove cowl seal.
3. Disconnect electrical connector from A/C accumulator.
4. Remove high speed blower fan relay. (2) 7mm screws
5. Disconnect electrical connector from blower resistor.
6. Disconnect electrical connectors from blower fan.
7. Remove blower vent tube.
8. Remove passenger side wiper arm. (use flat bladed screwdriver to open latch
on side of arm, then lift arm straight up)
9. Remove (2) wiper rests (7mm screws) and (3) 7mm screws securing lower
windshield trim.
10. Remove lower windshield trim. (Be careful, it would be
very easy to bend this trim as it is very thin....grab toward the middle with
one hand for extra support after clearing both ends)
11. Leaving hose connected, remove windshield washer nozzle and support.
Position nozzle aside.
12. Remove cowl vent. (a mix of hardware)
13. Position electrical harness (disconnected in steps 3, 5, and 6) out of the
way.
14. Remove blower motor (provides access for splitting case and leverage for
removal). (5) ¼” screws, (1) 7mm screw, and ground tab
15. Remove blower resistor. (2) 7mm screws
16. Remove (2) lower trim supports. (4) 12mm nuts
17. Loosen heat shield (if present). Remove clamp securing heat shield to
accumulator. Loosen 7mm screw securing bottom of heat shield. (provides
clearance for 2 upper case ¼” crews, next step)
18. Remove upper case (use putty knife between case seams to free upper case
from lower case). (4) 10mm bolts, (11) ¼” screws* (Watch
the bottom edge of the exposed windshield!!!! Don't pry against it, don't
hit it, just don't touch it! You will regret it if you do) Be
gentle, work it loose. If it seems to hang, try to figure out why instead
of increasing your force. Check the upper left (passenger side) and make
sure it clears that piece of metal that sticks out.
*Important. You should have removed 11 long ¼” screws before you attempt to split the case. If you don’t, you have missed one or more screws. The screw furthest back on the right side of the case may be covered in sealer. There are two screws that have to be accessed from under the vent screen.
Now, this is a damn good time to look at the old pieces and the new pieces and see if they appear to be identical. It can really chap you off if you empty the freon, water, or whatever, and then discover that the outlet tubes are not identical to the ones you took off.
19. Remove screw securing ground strap, retainer, and heater core. Position
ground strap aside.
20. Loosen clamps and disconnect heater hoses from heater core.
21. Lift heater core from retaining clip and remove heater core.
22. Transfer weather barrier to new heater core (good time
to vacuum any trash out of the box)
23. Fill new heater core with antifreeze (filling prevents aeration and noise
from new heater core). Reverse steps to install.
Be
sure you reinstall the ground strap. This is very important.
Use a strip type sealer on the top of the upper case along the cowl. Extend the sealer one bolt beyond the (4) 10mm screws removed in step 18, to prevent water from entering the passenger compartment.
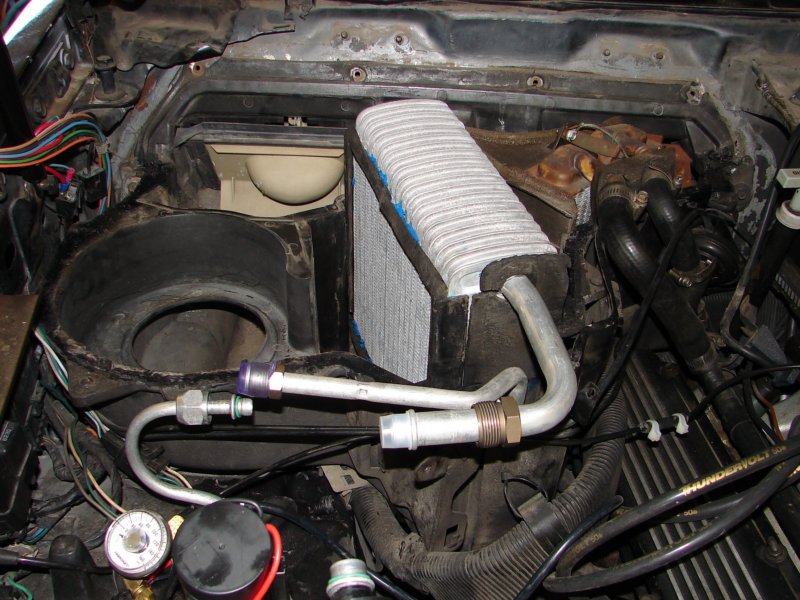
Below is a picture of the box after the top has been removed. Note at the back of the picture, that I removed everything in the way of lifting the cover up and off. Wiper, windshield lower trim, washer, wiper rests, etc. This is an excellent time to clean up any rust such as the spot in the left corner where some water leaked down down.
There is a strip of foam weather-stripping across the top that the four 10mm screws go. Put it back into place properly if it pulled out of the groove when the top comes off.
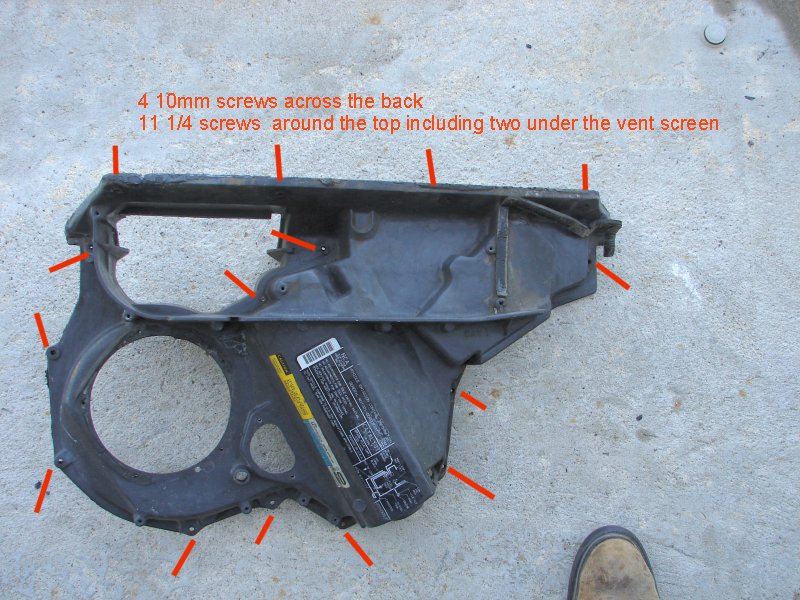
Here is a picture of the top cover showing the screws that have to be removed before it can be separated from the lower case. If required, replace the foam weather-stripping on the right side under the vent screen.
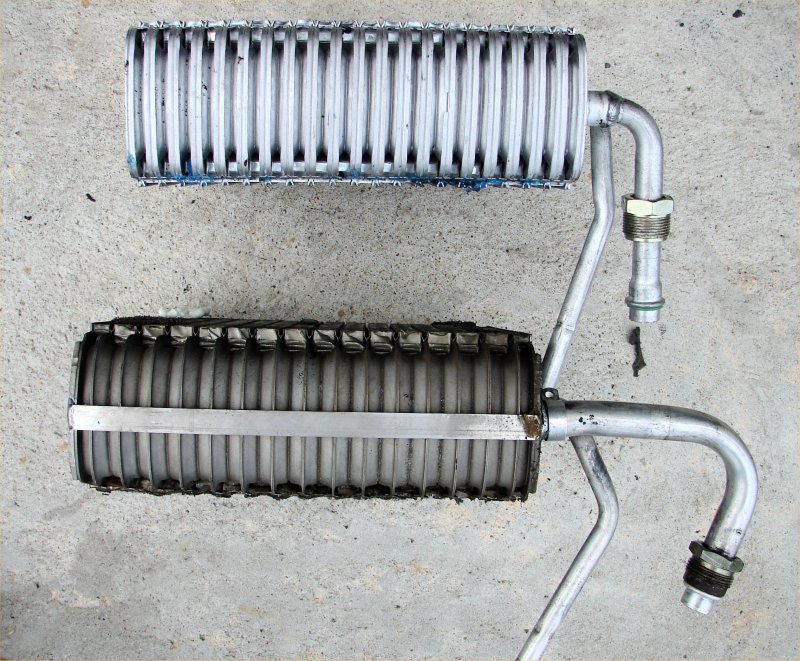
Below is a picture showing the factory evaporator and a new one that happens to be the wrong one for our cars. Yet, it is the one that most seem to carry under a listing for our cars. Note that the larger outlet tube that goes to the accumulator does not come out nearly far enough nor does it bend back at the right angle to connect to the accumulator. Don't stick your new orifice tube (I strongly recommend a variable orifice tube with R 134A for improved cooling in traffic at idle, or near idle) into the new evaporator until you know you have the correct unit.