
Ignition Switch
Note, if the Scan Tool is reading voltage that is considerably lower than what the battery is reading, the front connector on the switch may be dirty, or not making good contact. One of my cars varied the voltage 0.6 volt on the scan tool when I wiggled the connector. This is not good.
1. The ignition switch is not in the column behind the key. It is mounted down on the top of the column and is switched by a rod that runs from the key mechanism down to the switch.
2. To get to the switch:
A. Remove the under dash insulator panel (two screws in the front corners and a nut by the accelerator pedal.
B. Remove the dash trim panel that goes around the column. (two screws under the front edge)
C. Remove the two large nuts that hold the column up in place-
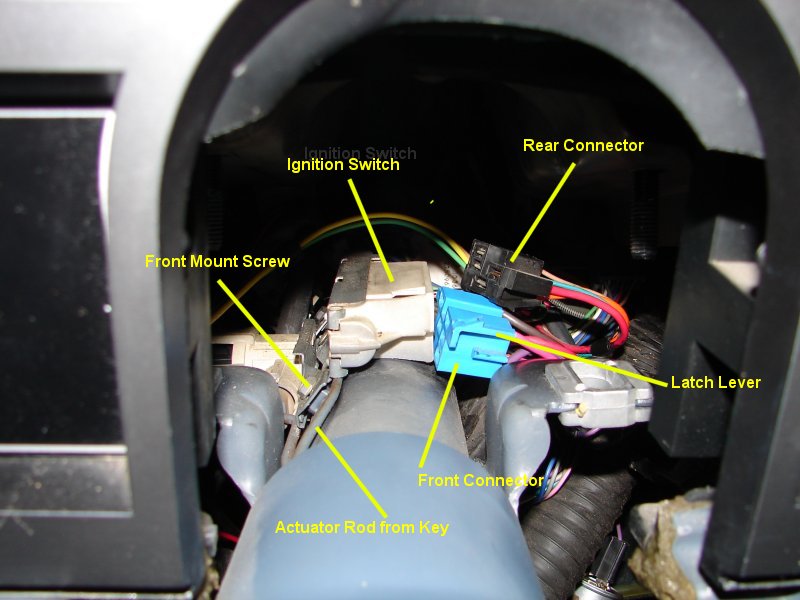
D. Lower the column to the position shown in the picture above.
3. To remove the connectors:
A. You must remove the rear connector (black) first. See the Latch Lever on the front of the blue front connector? There is one on the back of the black connector, but, on the bottom. Push it down and wiggle the rear connector out of the socket.
B. Now the front (Blue Connector) may be removed. Lift the Latch Lever up and wiggle the connector out of the switch.
4. To reassemble: The front connector must be installed first, and, then the rear connector can be inserted. Be sure both are firmly seated and the Latch Levers have clicked the retaining ears into place.
5. If you wish to install a new ignition switch, there are two screws on the left side that hold it to the column. The front one is visible in the picture above. The switch has slots in the mounting ear so that it can be adjusted to get sufficient throw on the switch to activate the starter when the key is turned to "Start".